
With Thanksgiving being notorious for spending time with family, what better way to spend that time than being creative together? All the crafts in this post incorporate natural elements to help reduce harmful waste (such as plastics, metals, and toxic paints) once it is time to dispose of the craft item.
Snapshot of This Post:
Pinecone Turkey Craft
Pumpkin Vases Craft
Turkey Leaf Lantern Craft
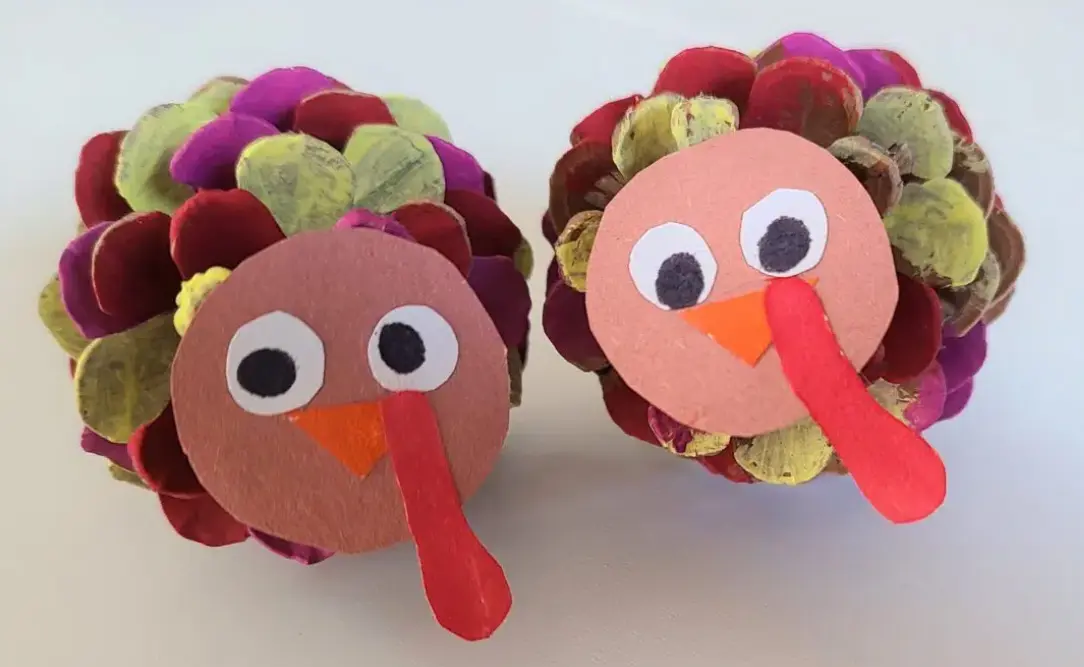
Pinecone Turkeys (inspiration from Big Living Little Footprint.com)
For a cute and playful take on a turkey craft check out this project whose process is especially kid-friendly!
Supplies – pinecone, brown, white, black, red, and orange construction paper, eco-friendly paint (any non-toxic paint should work), paint brushes, glue, scissors
Tip – Pick a pinecone that is as open as possible.
Steps:
- Paint individual pinecone scales in warm colors (yellow, red, orange)
- Cut out 1 large brown circle, 2 small white and 2 smaller black circles, 1 red skinny oval, and 1 orange triangle
- Glue the white circles onto the brown circle and then the black circles inside the white circles to create the eyes on the face
- Glue the orange triangle onto the brown circle under the eyes for a beak
- Glue the red oval beside the beak for the turkey’s gobble
- Glue the completed face onto the top of the pinecone
- All done! Lay pinecone on its side to see the “feathers” spread out behind the turkey’s face
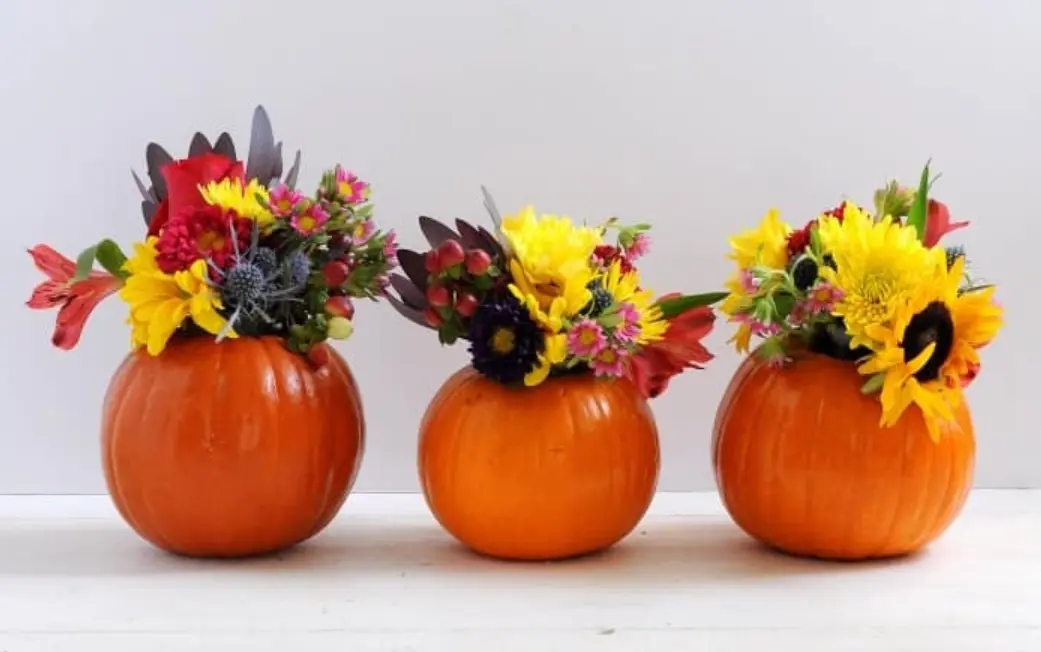
Pumpkin Vases (Inspiration from DIY Candy.com)
This project is more aimed toward an adult audience looking for a unique way to display their seasonal flower bouquets!
Supplies – small pumpkin, bouquet of flowers, small jars that will fit inside pumpkin, floral foam, knife, spoon, scissors
Tip – These will last at least two weeks but soaking the pumpkin in a bucket of water and 2/3 cups bleach after carving will make them last longer.
Steps:
- Cut a hole around the pumpkin stem large enough for the jar to fit inside, scoop out innards
- Trim floral foam to fit inside the jars, soak floral foam in water according to its packaging instructions, and tuck them inside the jars
- Insert flowers into foam, trimming the stems as needed, keep in mind the jar will be going inside the pumpkin, so the flowers need to be long enough to stick out of the top
- Slip jar inside pumpkin
- Rearrange flowers as desired by removing and reinserting until you are satisfied with your bouquet
- All done! Put on display in your home for all to see!
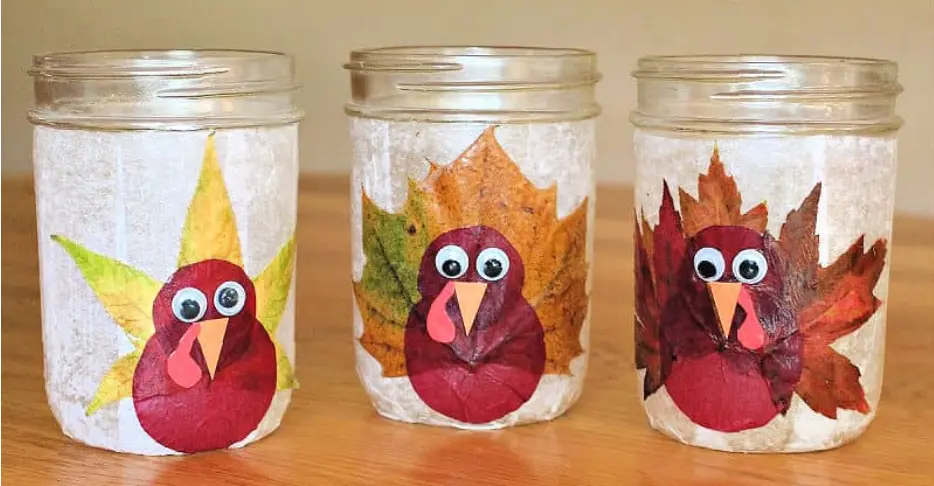
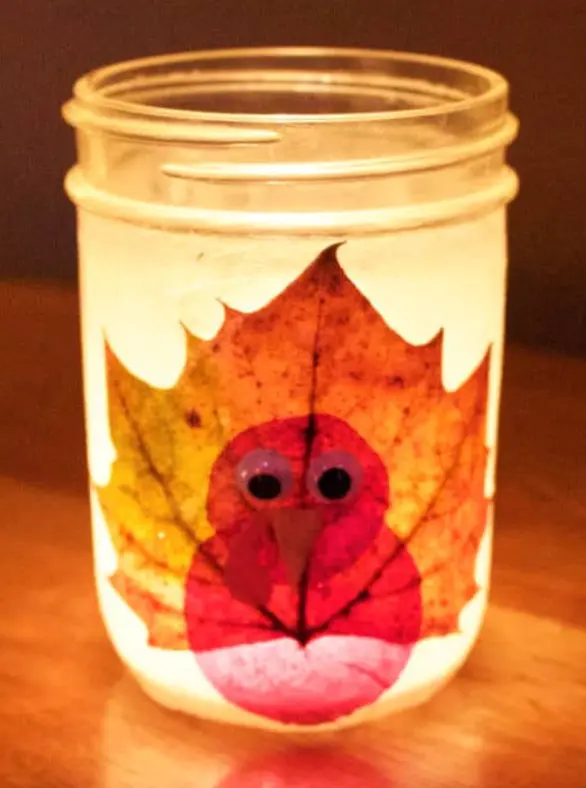
Turkey Leaf Lantern (Inspiration from Rhythms of Play.com)
This project is fun for all ages, but little ones may need assistance with certain steps.
Supplies – 16 oz mason jar, white and dark red or brown tissue paper, orange, red, black, and white construction paper, white Elmer’s glue, water, 1 fallen leaf, scissors, paper towels, books, tea light candle
Tips – Use Mod Podge instead of watered-down glue for a stronger hold. If you’re using a wax candle, fill the bottom third of the jar with sand to catch any drips and keep candle in place.
Steps
- Gather fallen leaves from outside, rinse and dry the leaves off, place between paper towels and set under a book for 12 hours
- Cut white tissue paper into 1 or several long strips that will cover the outside of the mason jar
- Paint watered-down glue onto jar
- Wrap white tissue paper strip around jar, paint more watered-down glue on top of tissue paper
- Cut one large circle out of the dark red or brown tissue paper for the turkey body, and 1 smaller circle for the head
- Cut a small triangle from orange construction paper for the turkey’s beak, a small teardrop shape out of red construction paper for the gobble, and small circles out of black and white construction paper for the eyes
- Glue flattened leaf onto jar (it will act as the turkey tail feathers)
- Paint watered down glue on top of leaf and place tissue paper circles on top of leaf to form the turkey head and body
- Finish off the face by glueing the beak, gobble, and eyes onto the tissue paper face. Then paint watered-down glue on top of the entire turkey
- Let dry before placing a tealight candle inside jar
- All done! Put on display for all to see!
Try out these fun crafts for some family bonding time this Fall and stay tuned for our pop-up workshops this holiday season! Click below to see some pictures from our most recent workshop!
Click Here to View Our Latest Workshop!